
A T-shirt fits correctly before embroidery.
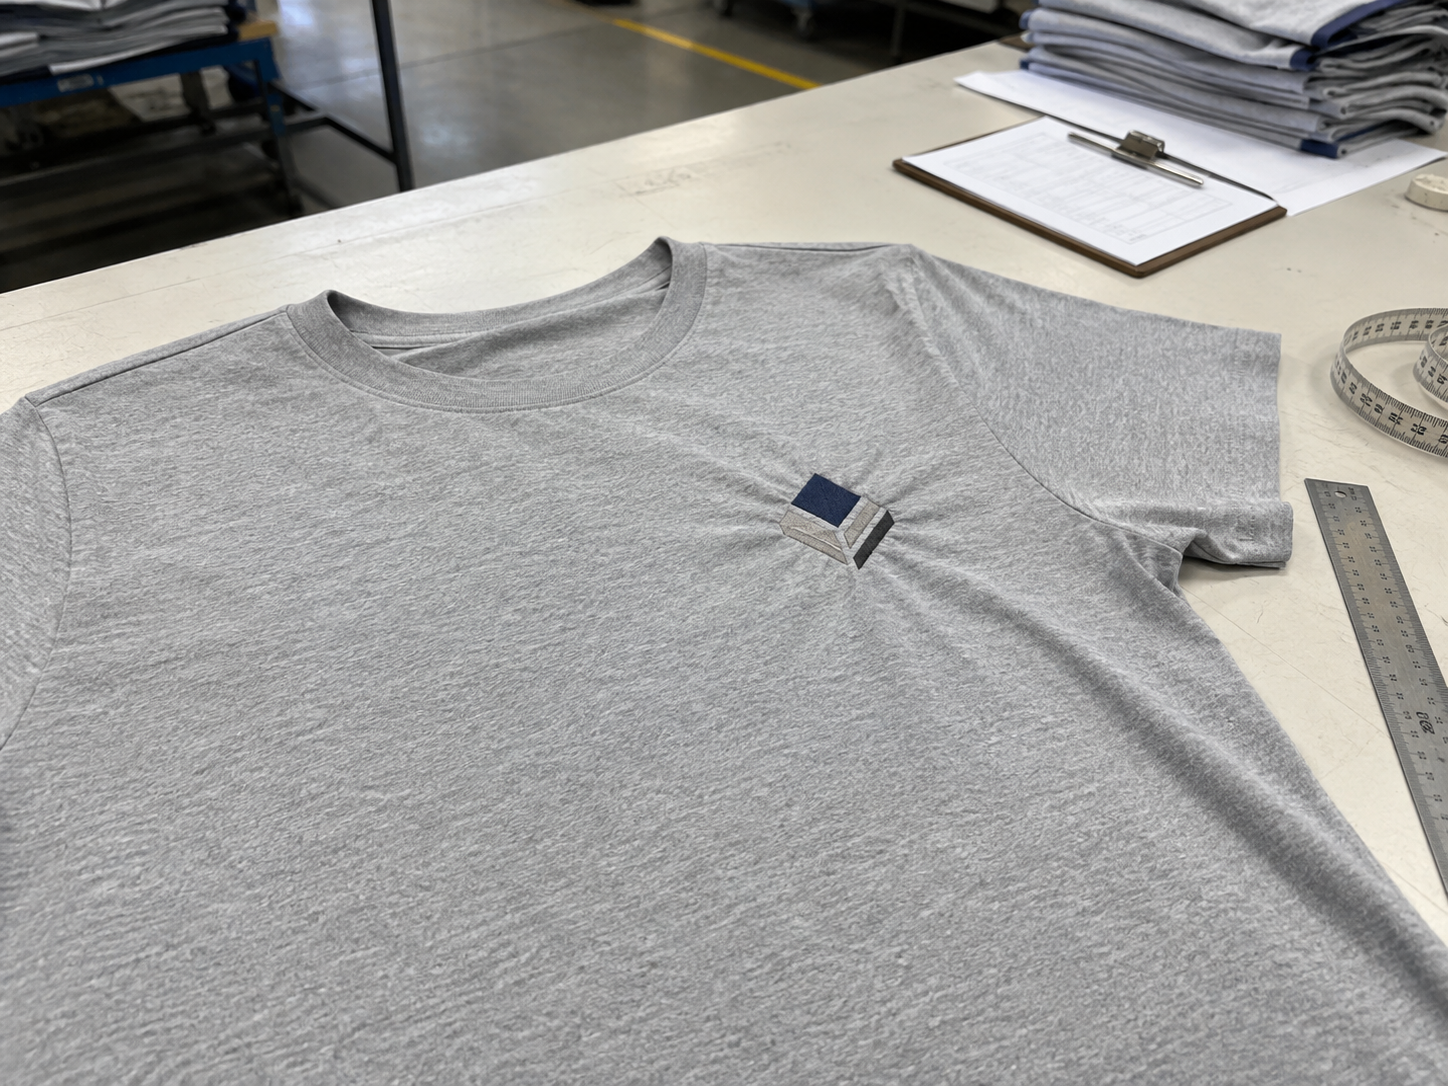
Then the logo is stitched onto the chest or back—and suddenly the fabric around the embroidery looks tighter, the garment does not lie completely flat, or the embroidered area seems slightly smaller than expected.
In some cases, the distortion becomes even more noticeable after washing.
Why does this happen?
Embroidery adds thousands of stitches into a flexible knitted fabric.
Those stitches create tension and pull the fabric inward. If the embroidery is too dense, the backing is unsuitable, or the design is not digitized correctly for the fabric, the T-shirt can become distorted around the embroidered area.
From our experience developing custom streetwear, the final result depends on the complete combination of:
Fabric + Stitch Density + Backing + Tension + Hooping + Digitizing + Washing
Table of Contents
- Why Embroidery Can Change T-Shirt Shape
- 1. Embroidery Stitches Pull the Fabric Inward
- 2. Lightweight and Stretchy Fabrics Distort More Easily
- 3. High Stitch Density Can Make the Embroidered Area Smaller
- 4. The Wrong Backing Can Allow the Fabric to Move
- 5. Incorrect Hooping Can Stretch the T-Shirt Before Embroidery
- 6. Digitizing Must Compensate for Fabric Movement
- 7. Washing Can Make Distortion More Visible
- How We Test Embroidery Before Bulk Production
- How Can Brands Reduce Embroidery Distortion?
- Frequently Asked Questions
- Final Recommendation
Why Embroidery Can Change T-Shirt Shape
A T-shirt is usually made from knitted fabric.
Unlike rigid woven fabrics, jersey can stretch and move easily.
Embroidery is very different.
Once thousands of stitches are concentrated in one area, that section becomes more rigid than the surrounding fabric.
The embroidery thread also creates pulling forces as each stitch is formed.
This means the finished garment contains two areas behaving differently:
Embroidered Area → More Stable and Rigid
Surrounding Jersey → Soft and Flexible
If these forces are not controlled, the fabric around the logo may pull inward or change shape.
Wilcom's embroidery documentation explains that embroidery stitches naturally pull fabric inward where the needle penetrates, which can contribute to puckering and distorted outlines.
External reference:
1. Embroidery Stitches Pull the Fabric Inward
This is the basic reason embroidery can change the shape of a T-shirt.
Imagine a large embroidered rectangle.
The embroidery machine places thousands of stitches across that area.
Each stitch adds a small amount of tension.
One stitch does almost nothing.
Thousands of stitches together can create noticeable pulling.
The result may be:
- Fabric pulling toward the center
- Logo edges becoming distorted
- Small wrinkles around the embroidery
- The embroidered section becoming slightly narrower
- The T-shirt no longer lying completely flat
This effect is often called pull distortion.
Professional embroidery digitizing software uses pull compensation specifically because this movement is expected during embroidery.
The goal is not to eliminate every physical force.
The goal is to compensate for it before production.
2. Lightweight and Stretchy Fabrics Distort More Easily
Fabric structure has a major influence on embroidery stability.
Compare:
Heavyweight Fleece Hoodie
with
Lightweight Cotton Jersey T-Shirt
The heavyweight hoodie has more structure.
It can normally support a larger embroidery design with less visible movement.
A lightweight or stretchy T-shirt fabric can move much more easily.
This makes it more sensitive to:
- Stitch tension
- Dense embroidery
- Hooping
- Backing selection
- Large embroidery areas
This does not mean lightweight T-shirts cannot be embroidered.
It means the embroidery construction needs to match the fabric.
For example, a small chest logo may work very well.
A large, fully filled back embroidery may require significantly more development.
If you are selecting fabric for a new streetwear project, read:
How to Source Streetwear Fabrics
3. High Stitch Density Can Make the Embroidered Area Smaller
Stitch density is another important factor.
A large solid embroidery graphic can contain tens of thousands of stitches.
As more stitches are packed into the same area, the embroidered section becomes increasingly rigid.
This can create stronger pulling around the design.
For example:
Lower-Density Embroidery
More flexible and easier for lightweight fabric to support.
Very Dense Embroidery
More rigid and more likely to pull or distort soft jersey.
A common mistake is assuming:
"More stitches mean better embroidery."
That is not always true.
High-quality embroidery is about using the correct number and type of stitches for the fabric and artwork.
Sometimes we may reduce distortion by:
- Reducing unnecessary stitch density
- Opening negative spaces
- Changing fill direction
- Reducing overlapping stitch areas
- Modifying underlay
- Converting some filled areas into outlines
This can maintain the intended appearance without making the embroidered area unnecessarily heavy.
4. The Wrong Backing Can Allow the Fabric to Move
Backing, also called a stabilizer, supports the fabric during embroidery.
This is especially important for knitted T-shirts.
Without enough support, the jersey can move as the needle repeatedly enters the fabric.
That movement can lead to:
- Distortion
- Puckering
- Poor stitch formation
- Uneven logo shapes
- Fabric stretching
Madeira explains that embroidery backing helps keep fabric stable and can reduce puckering, shifting, and distortion during embroidery.
External reference:
Madeira – Machine Embroidery Stabilizers
However, simply adding the thickest possible backing is not the solution.
Too much backing can make a lightweight T-shirt feel stiff and uncomfortable.
The backing should be selected according to:
- Fabric weight
- Fabric stretch
- Embroidery size
- Stitch count
- Design structure
For stretchy knit fabrics, cut-away or other suitable stabilizing systems are commonly considered because some support remains with the embroidery after production.
5. Incorrect Hooping Can Stretch the T-Shirt Before Embroidery
The garment needs to remain stable while the embroidery machine is running.
This is why embroidery hoops are used.
But the fabric should be held securely without being excessively stretched.
If a T-shirt is pulled too tightly inside the hoop, the fabric is temporarily stretched.
The embroidery is then stitched onto that stretched fabric.
When the T-shirt is removed from the hoop, the jersey naturally tries to return to its original shape.
The embroidery cannot contract in exactly the same way.
This difference can make the area around the logo appear:
- Wrinkled
- Pulled
- Smaller
- Distorted
This problem may be especially noticeable on:
- Stretch jersey
- Lightweight cotton
- Cotton-spandex blends
- Rib fabrics
Good hooping should stabilize the garment without unnecessarily changing its natural dimensions.
6. Digitizing Must Compensate for Fabric Movement
Artwork cannot simply be converted into embroidery without considering the fabric.
Before production, the artwork must be digitized.
Digitizing controls:
- Stitch direction
- Stitch density
- Underlay
- Stitch sequence
- Fill construction
- Pull compensation
Pull compensation is particularly important.
Because embroidery stitches naturally pull fabric inward, the digitized design may need to extend slightly beyond the original artwork dimensions.
After embroidery, the pulling effect brings the finished shape closer to the intended size.
Wilcom describes pull compensation as adding additional stitch width to compensate for the way fabric pulls and compresses during embroidery.
External reference:
Wilcom – Understanding Push and Pull Compensation
This is why the same embroidery file may not perform equally well on:
- Heavy fleece
- Lightweight jersey
- Stretch fabric
- Denim
- Nylon
The digitizing should ideally reflect the actual material being embroidered.
You can also read:
How Are Custom Embroidered Hoodies Made?
7. Washing Can Make Distortion More Visible
Sometimes embroidery looks acceptable immediately after production but appears more distorted after washing.
This can happen because the embroidery and the T-shirt fabric react differently to laundering.
The embroidery thread and stabilizer may remain relatively stable.
The cotton jersey around them may relax or shrink.
For example:
Before Washing
Fabric and embroidery appear relatively flat.
After Washing
The surrounding cotton fabric becomes slightly smaller while the embroidery remains more stable.
This difference can increase:
- Wrinkling
- Puckering
- Pulling
- Shape distortion
This is especially important for:
- 100% cotton T-shirts
- Garment-washed T-shirts
- Vintage washed products
- Pigment-dyed garments
If the garment will go through washing during production, we prefer checking the embroidery after the intended wash process, not only immediately after embroidery.
How We Test Embroidery Before Bulk Production
For a new embroidered T-shirt, we prefer testing the embroidery on the actual production fabric.
A typical development process is:
Artwork
↓
Digitizing
↓
Backing Selection
↓
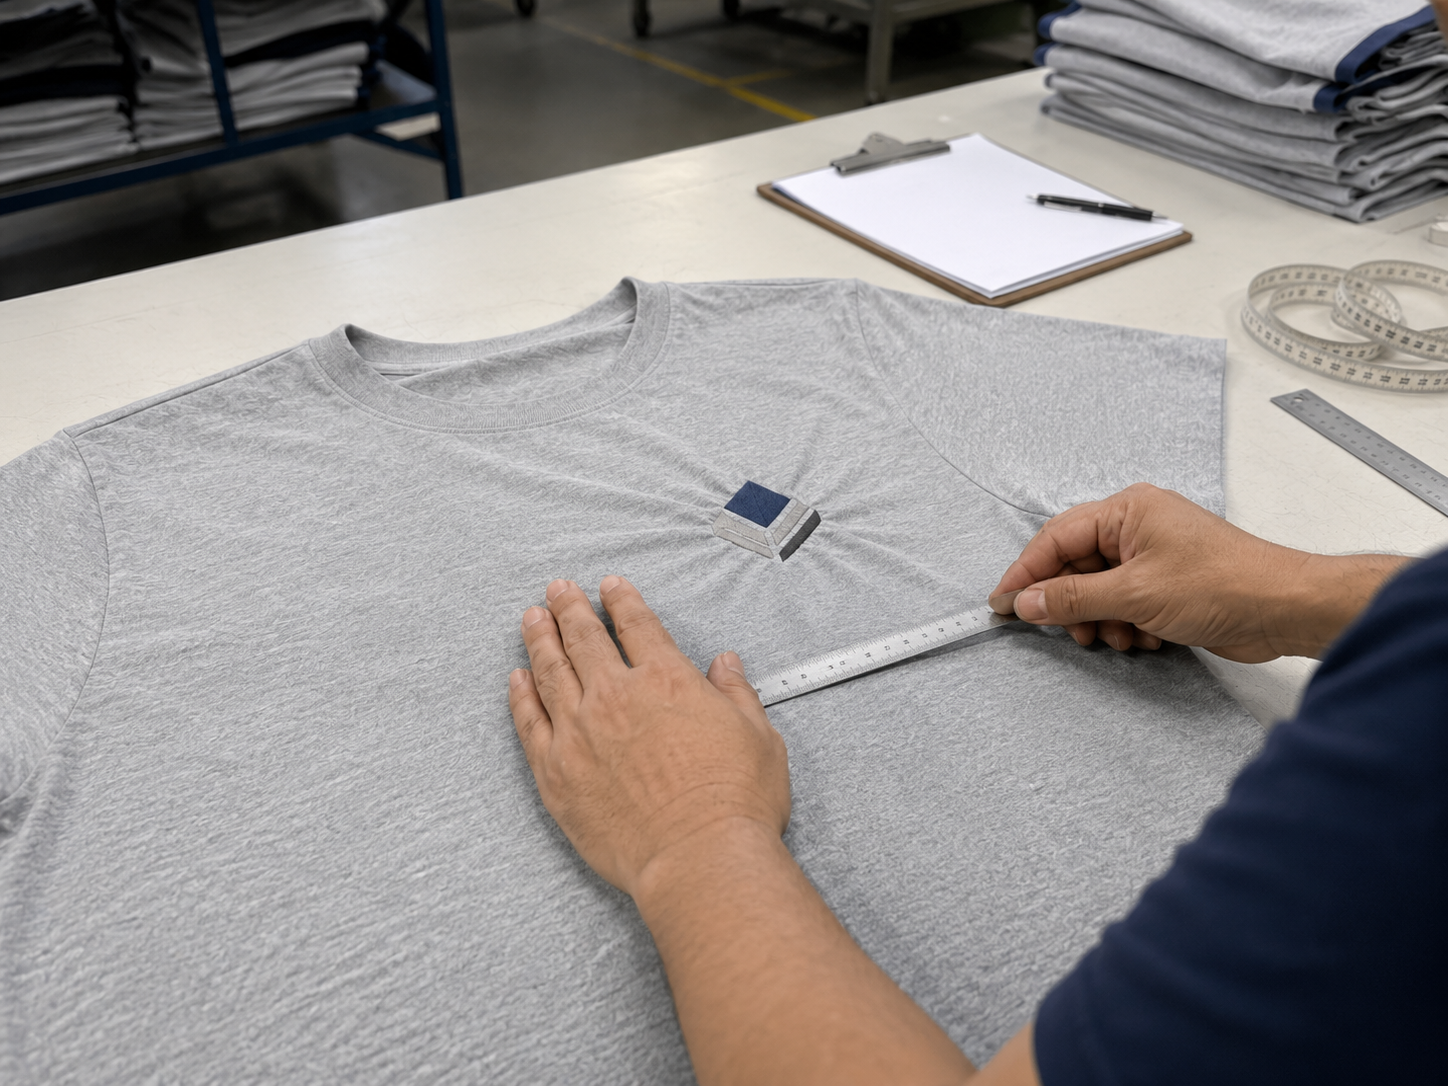
Test Embroidery
↓
Check Shape and Distortion
↓
Adjust Digitizing if Needed
↓
Wash Test if Required
↓
Final Sample Approval
↓
Bulk Production
During testing, we normally review:
- Logo dimensions
- Fabric puckering
- Edge distortion
- Small lettering
- Stitch density
- Fabric stretching
- Backing visibility
- Embroidery stiffness
- Appearance after washing
If the embroidery pulls the garment too much, we may adjust the design before bulk production.
This is much easier than trying to correct the issue after hundreds of T-shirts have already been embroidered.
How Can Brands Reduce Embroidery Distortion?
There is no single solution because every fabric and embroidery design is different.
However, several steps can reduce the risk.
1. Use the Actual Production Fabric
Do not approve embroidery only on a substitute fabric if the final material behaves differently.
2. Avoid Unnecessary Stitch Density
A clean embroidery does not need the maximum possible stitch count.
3. Select Suitable Backing
The stabilizer should support the fabric without making the garment excessively stiff.
4. Control Hooping
The garment should be stable but should not be stretched unnaturally before embroidery.
5. Adjust the Digitizing
Stitch direction, density, underlay, and pull compensation may need to change according to the fabric.
6. Test Large Designs Carefully
Large back embroidery creates more pulling force than a small chest logo.
7. Check the Garment After Washing
If the final product will be washed, pigment dyed, or vintage finished, evaluate the embroidery after that process.
For some large graphics, another decoration method may also provide a better result.
You can compare different options here:
Embroidery vs Puff Print for Streetwear
Frequently Asked Questions
Does embroidery actually shrink a T-shirt?
Embroidery does not necessarily shrink the entire garment.
However, concentrated stitches can pull the fabric inward and make the embroidered area appear smaller or distorted.
Why does my embroidered T-shirt look smaller around the logo?
The embroidery may be pulling the jersey toward the center of the design.
High stitch density, insufficient backing, or incorrect digitizing can increase this effect.
Why does the logo change shape after embroidery?
Embroidery creates push-and-pull forces in the fabric.
Digitizing techniques such as pull compensation are used to help maintain the intended shape.
Is heavyweight cotton better for embroidery?
Heavyweight cotton often provides more structure than very lightweight jersey, which can make embroidery easier to control.
However, fabric weight alone does not guarantee a good result.
Can large embroidery be used on a T-shirt?
Yes.
But large, dense embroidery normally requires more testing because it creates more stiffness and pulling force.
Sometimes reducing filled areas or using a combination of embroidery and printing produces a better result.
Why does embroidery look more wrinkled after washing?
The T-shirt fabric and the embroidered area may react differently to washing.
If the cotton fabric relaxes or shrinks while the embroidery remains more stable, puckering can become more noticeable.
Should embroidery be tested before bulk production?
Yes.
For custom streetwear, especially lightweight or stretchy T-shirts, testing the actual embroidery on the final fabric is strongly recommended.
Final Recommendation
If embroidery shrinks or distorts a T-shirt, do not look at only the embroidery machine.
Check the complete combination:
Fabric + Stitch Density + Backing + Hooping + Thread Tension + Digitizing + Washing
From our production experience, the best embroidery result comes from designing the embroidery construction around the garment rather than forcing the same embroidery file onto every fabric.
The safest workflow is:
Final Fabric → Digitizing → Test Embroidery → Check Distortion → Adjust → Wash Test → Approve → Bulk Production
This helps prevent embroidery problems before bulk production begins.
If you are developing embroidered oversized T-shirts, hoodies, sweatshirts, or other custom streetwear, Fuki Apparel can help with fabric sourcing, embroidery development, sampling, testing, and bulk production.